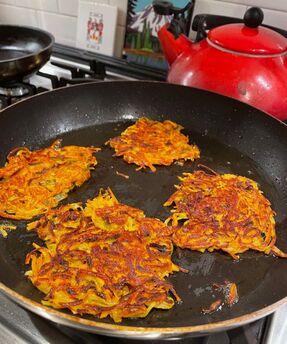
 I have fond memories of potato pancakes growing up, smothered in applesauce or sour cream. Lately, I have come to really enjoy sweet potatoes, so the marriage of the two in this recipe caught my eye. The lemon-tahini sauce is a bit more of a time-consuming preparation than the plain old sour cream or applesauce. We have topping options in my household, as my kids prefer the simpler toppings, but the creamy punch of the L-T sauce makes for an excellent dish.
Ingredients: 3/4 cup plain yogurt 2 tablespoons tahini 2 tablespoons lemon juice 1 garlic clove, finely grated 1/2 teaspoon black pepper 2 1/2 teaspoons salt, divided 1 lb sweet potatoes, peeled and grated 1 lb Yukon Gold potatoes, peeled and grated 1 1/2 tablespoons olive oil 2 medium leeks, white and light green parts thinly sliced 2 large eggs, beaten 1/4 cup flour 1/2 teaspoon ground cumin 1/2 teaspoon ground turmeric 1/2 teaspoon ground ginger oil for frying (vegetable is best) Instructions: Make the sauce: Whisk together the yogurt, tahini, lemon juice, garlic, pepper and 1/2 tsp of salt into a small bowl and set aside. In a large colander (over a bowl or the sink) add the shredded potatoes and 2 tsp salt. Toss to combine and let stand for at least 10 minutes. Squeeze out the excess liquid, then transfer to a large bowl. In a large skillet, heat 1 tablespoon over medium. Add the leaks and a pinch of salt. Cook, stirring occasionally, until the leeks are soft and starting to brown, about 5 minutes. Add the leeks, eggs, flour, cumin, turmeric, and ginger to the potato mixture and stir until evenly combined. Cover your skillet with oil and heat over medium until shimmering. Working in batches, spoon batter for each fritter into the skillet and flatten with a spatula. Cook until golden and getting crisp, 2-5 minutes per side. Transfer the fritters when done to a paper towel over a plate to drain the oil. Add more oil to the skillet between batches if needed. Serve with lemon-tahini sauce, apple sauce, plain yogurt or sour cream. Enjoy!
0 Comments
3/11/2024 0 Comments Strength Training for RunnersBy Jess Kehoe, DPT 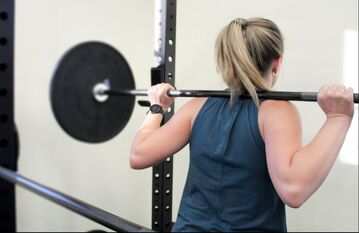 Missoula is full of runners. We are blessed to have ample trail systems which, nearly anywhere you live, can be accessed nearby. We have big hills to run up and down and miles of pavement to pound if that’s your preference. We’ve got professionals and near professionals in our midst, and those of us just in it for the regular daily jog, with their dog or friends. No matter the category you fall into, runners are always looking for ways to stay on their feet, and avoid the common injuries. That brings us to the point of this blog, the benefits of a weight training program for runners.
There is evidence coming out of the Montana Running Lab here at the University of Montana, that there are several positive benefits to getting stronger. Some of these that can directly impact running are increased bone mass, stiffer tendons and more resilient joints. Another recent systematic review(1) looking at non-running based injury prevention programs has shown that the most effective requires more than 6 weeks of consistency, and are more effective with professional guidance. This makes some intuitive sense since it takes 6 weeks to begin making changes in your muscle tissues with a weight training program, so staying consistent for the long haul will give you the most benefit. Also it appears that having a professional guide might make it more likely that you are consistent and that you are working to your full potential. Maybe you are new to this idea, or maybe you have been lifting for years. Maybe you have been struggling with a chronic injury or just interested in trying to improve your strength. In any case, the PTs here at Alpine think that adding a strength training program to your routine is a worthwhile investment. Adding exercises like the back squat, single leg Romanian deadlift, planks, calf raises and plyometrics to name a few can challenge your muscles and tendons to increase strength and resiliency for running. To avoid feeling like your lifting training causes fatigue for running, we have a few suggestions. First, lifting twice per week is enough. If you have been consistent with lifting for several months, and your running is ramping up, there is even evidence(2) that maintaining only one weight training session per week can help retain strength benefits. Second, the number of exercises doesn’t have to be many, you can keep it to 4 or 5, and only 3-4 sets per session. If you feel this causes fatigue in your running, reduce a set but keep the weight heavy. Also, don’t work until complete exhaustion, allow 2-3 more reps in the tank for each set and take a 2-3 minute break between exercises to avoid circuit training. Thirdly, if you are trying to lift and run on the same day, run first. This way you can adjust your lifting if you are feeling fatigued, instead of tired legs from the lift affecting your run. For many weight lifting programs you will see reference to a 1RM which stands for one repetition max, or the weight you could lift for only one attempt. The guidance coming out of the Montana Running Lab is that the best range to work in is 70-80% of your 1RM. There are some apps out there that will calculate your 1RM such as this one. However, if you don’t work out at a gym, or don’t feel the need to be quite so scientific about it, you can also use the following general advice. Muscles will strengthen due to the overload principle, complete 3-4 sets of 6-8 reps at a weight that makes it feel that you cannot do many more. If you don’t have complete weight sets available to you then the next best option is to use a challenging weight, and complete as many reps for 2-3 sets that causes fatigue, or again gets you to where you cannot do many more with good form. For instance at home I only have a 20# dumbbell, so I might do 2 sets of 15 Bulgarian split squats with this weight, but if I’m in the gym I’ll go heavier and complete the 3-4 sets of only 6-8 reps. Always remember that you shouldn’t experience pain during your lifting or running and ignoring pain for too long can make it worse. If you need guidance for starting a new program, or getting help to reduce an injury contact Alpine PT and we can help get you on your way. References: 1. Wu H, Brooke-Wavell K, Fong DTP, Paquette MR, Blagrove RC. Do Exercise-Based Prevention Programs Reduce Injury in Endurance Runners? A Systematic Review and Meta-Analysis. Sports Med. 2024 Jan 23. doi: 10.1007/s40279-024-01993-7. Epub ahead of print. PMID: 38261240. 2. Steele, James, et al. “Long-term Time-course of Strength Adaptation to Minimal Dose Resistance Training: Retrospective Longitudinal Growth Modelling of a Large Cohort Through Training Records.” SportRxiv, 27 Jan. 2021. Web. 2/8/2024 0 Comments Lemony Green Pasta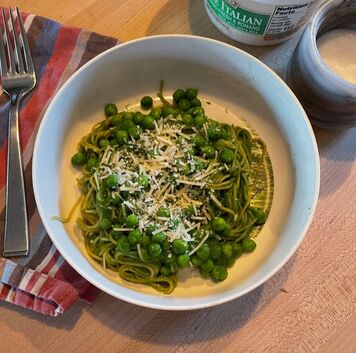 My kids love "green pasta", which normally implies a pesto base. I recently saw this different recipe online and I like variety, so I decided to change up the menu. This recipe could be fully vegan if you opt non-dairy cheese, but we went with a regular parmesan, which is a family favorite pasta topper. The lemon gives this dish a brighter taste than traditional basil pesto and it seemed to go over quite well with my family. My 7 year old was initially adverse to the change up of her favorite dish, but came around to the new flavor profile after a few bites, phew! Enjoy!
Ingredients: 3 tablespoons olive oil 4 large scallions, thinly sliced 4 garlic cloves, thinly sliced 2 teaspoons lemon zest 1 tablespoon lemon juice (from 1 lemon) 2 leeks, coarsely chopped (white and light green parts only) 2 cups stemmed and coarsely chopped Swiss chard 3 cups packed baby spinach 1 tablespoon plus 1 teaspoon white miso paste 1/4 teaspoon salt, plus more to taste 16 ounces pasta (any kind will do) 1 1/4 cups frozen peas Freshly grated Parmesan (optional, can use vegan) Instructions: Salt a large pot of water and bring to a boil. Add leeks to this and cook, stirring occasionally for about 2 minutes. Then add the chard and spinach, cook until the greens turn bright green, about 2 minutes. Remove from heat. Using a slotted spoon, remove the leeks and greens from the water and transfer to a blender. Reserve this cooking water in the pot. While the water in the first step is coming to a boil, heat the oil in a medium pan over medium heat. Add the scallions, garlic and cook stirring often until garlic is tender about 3 minutes. Stir in the lemon zest and let sizzle for a few seconds, then remove from the heat. Add the scallion mixture, miso, salt and 1/4 cup of the cooking water to the blender (with the leeks and greens). Process until very smooth. Return the cooking water in the pot to a boil. Add the pasta and cook according to the package. Add the peas with about 1 minute remaining of this cooking time. Drain and reserve 1/2 cup of cooking water. Toss the pasta and peas with with the puree sauce, adding a little reserved cooking water if needed, until the sauce is creamy. Add lemon juice and additional salt to taste. Serve in bowls and top with cheese (vegan if desired). Enjoy! 1/25/2024 0 Comments Spaghetti Squash Pad Thai When your co-worker (Gary) announces that he has "40 or so" spaghetti squash that he'd love to share with anyone who wants one. This recipe does call for a wok, which is kinda fun, but a big frying pan also works just fine. This is also an excellent recipe for using up a variety of different veggies you might have on hand. This recipe calls for tofu, but you can substitute chicken or shrimp with equally good results. (Reminder that I am not a food photographer!)
Enjoy! Ingredients: For the Sauce: 2 tablespoons tamarind paste (or rice wine vinegar, see Recipe Note) 2 tablespoons fish sauce 2 tablespoons palm sugar or brown sugar 2 to 4 tablespoons water, to thin For the Pad Thai 1 medium spaghetti squash (you can also use rice noodles!) 3 tablespoons peanut oil 16 ounces extra-firm tofu, cubed 4 tablespoons cornstarch 1 medium yellow onion, thinly sliced 2 medium carrots, halved and sliced 1 bell pepper 1/4 in diced (any color will suffice) 2 large eggs, whisked 4 cloves garlic, minced 4 scallions, cut into 1- to 2-inch pieces 1/2 cup bean sprouts, plus more to serve (optional) 1/4 cup chopped peanuts, to serve Lime wedges, to serve Cilantro, to serve Red pepper flakes, to serve Instructions: First make the sauce: Whisk together the tamarind paste, fish sauce, and palm sugar, 2 tablespoons of water. Microwave on high heat for 30 seconds and whisk until everything is combined into a thin sauce. The sauce should taste very strong, but still palatable; add more water if needed to reach a good balance of tartness and pungency. Measure out at least 1/2 cup to be used for this recipe, more if desired; remaining sauce will keep in the fridge for several weeks. Prepare the squash: First cut the squash in half length-wise and scrape out the seeds. You can cook it in in the microwave on high for 15 minutes, or in the oven at 400 degrees for 30-45 minutes. Once cooked, shred the inside with a fork and set aside. Prepare the veggies and tofu: Drain and squeeze the liquid out of your tofu. It's even better if you take the time to wrap and press the water out. To do this, wrap the tofu in an absorbent kitchen towel and place it between two baking sheets, putting some heavy books on the top. Let sit for 15-20 min. Then cube the tofu and toss in the cornstarch until all the cubes are evenly coated with a gummy layer of cornstarch. Set aside while you prep the rest of the ingredients; make sure all the ingredients are prepped before you begin cooking. Place a large bowl next to the stove to hold ingredients as they come out of the wok. Heat a wok or large skillet over high heat until a flick of water dissolves almost instantly on the surface. Add a tablespoon of peanut oil and quickly swirl the pan to coat. Add the tofu and stir-fry until golden on all sides, 2 to 3 minutes. Transfer the cooked tofu to a plate. (Adjust the heat as needed if your pan starts smoking.) Warm another tablespoon of peanut oil in the pan and add the onions, carrots and peppers. Cook until all the veggies are just starting to soften and show golden color, 3 to 4 minutes. Transfer to the bowl with the tofu. Warm another half tablespoon of peanut oil in the pan and swirl to coat the bottom. Whisk the eggs one more time and then pour them into the bottom of the pan. Cook, tilting the pan to create a very thin omelet. When the eggs are almost set, begin nudging and cutting them with your spatula to create big curds. Transfer the cooked eggs to the bowl. Warm the last half tablespoon of peanut oil in the pan and add the garlic. Fry until the garlic is fragrant and golden, about 10 seconds. Add all of the spaghetti squash and spread into a single layer. Cook for 30 seconds or so, then stir the squash and spread it back out again. Repeat a few times until the squash is warmed and beginning to show golden, roasted color. Drizzle 4 tablespoons of the pad Thai sauce around the outside edge of the pan, then stir it into the squash. Continue stirring until the sauce evenly coats all the squash. Give it a quick taste and add up to 2 tablespoons additional sauce if needed. Add the scallions and bean sprouts to the pan with the squash, and stir to combine. Add the tofu, veggies, and egg back to the pan and stir to combine. Taste again, adding additional sauce if needed. Transfer the pad Thai to a large serving plate and top with chopped peanuts, cilantro, red pepper flakes, and lime wedges. Serve immediately while still very hot. Leftovers reheat well and will keep for up to a week in the fridge.  Welcome 2024! I never make any official dietary resolutions, but I have usually engaged in plenty of overeating and extra dessert since Thanksgiving, so I always feel the need to start fresh in January. Here is a super easy dish to check that box and that you can adapt to your liking. You could easily add cooked chicken or adding mushrooms as you sauté the veggies would be tasty as well. So good luck with your new year resolutions, whether they include any dietary or fitness themes or not, and here's to health and happiness the whole year through.
Ingredients: 1lb pasta of your choice (bowties, penne, or orecchiette work great) 1 15oz can drained chickpeas 1/4 tsp cumin 1/4 tsp ground coriander salt and pepper to taste 1/4 cup extra-virgin olive oil 4 garlic cloves, diced 1/2 tsp crushed red pepper flakes 1 cup grape tomatoes, halved 2 cups Swiss chard, kale or other green, stemmed and leaves coarsely chopped 4 oz fresh mozzarella, 1/2 inch cubed 8 basil leaves, torn Instructions: Cook the pasta as directed. Drain and reserve 1/2 cup of the cooking water. In a medium skillet heat the olive oil on moderately high heat, add the garlic, cumin, coriander and crushed red pepper and cook until fragrant, only about 30 seconds. Add the tomatoes and cook until they begin to soften. Add the greens and cook stirring until wilted, about 5 minutes. Season with salt and pepper. Add in the pasta, reserved cooking water and the chickpeas. Stir and cook over medium heat. Add the basil and mozzarella and stir until the cheese begins to melt and the chickpeas warm up. Serve in bowls and enjoy! 12/21/2023 0 Comments 401K for your body It's the New Year and we don't want to bring up the oft overly-challenging resolutions, but here is something important to think about. We imagine you have plans to retire, correct? Like many people, you probably have a list of things you are hoping to do in your retirement. Many of us have been making plans for retirement for years, and primarily this planning revolves around our future financial security. But have you thought about your physical abilities when you are of the respectful retirement age? Many of us will be working well into our late 60's. A strong message from your PT's at Alpine here, there are wildly ranging differences in the functional abilities for the aging retirees we get to treat. Whatever your age now, as they say in finance, it's never too late to start preparing. Also, prioritizing more movement in your day can be hard. There are ample demands of our available time these days; adequate nutrition, transportation, technology, virtual meetings, social media… to name a few. Here are a few suggestions we would like to offer to ensure that your body’s physical health is prioritized for when you should have more time to use it!
12/11/2023 0 Comments Christmas Casserole This is my family's favorite Christmas breakfast dish, we have traditionally made it for several years now. My husband makes it the day before and then we just have to pop it in the oven Christmas morning. It cooks while everyone is opening gifts and presto, it is ready when people are hungry!
Ingredients: Butter, for greasing the pan 2 tablespoons olive oil 1/2 cup finely diced pepperoni, about 2 ounces 1/2 lb shiitake mushrooms (we use regular mushrooms) cut into 3/4 inch pieces 1 medium onion, minced 1 red bell pepper, cut into 1/2 inch pieces 2 teaspoons salt 8 large eggs 3 cups whole milk 1 tablespoon Dijon mustard 1 tablespoon soy sauce 1/2 teaspoon pepper 3/4 lb day-old challah, sliced into 1 inch pieces (about 10 cups) 6 oz Black Forest ham, finely diced (1 1/4 cups) 1 cup shredded Monterey Jack cheese 1 cup shredded aged white cheddar cheese 1/2 cup finely chopped scallions, plus some thinly sliced for garnish Directions: Butter a 9x13 inch baking dish. In a large skillet heat the olive oil on medium. Add the pepperoni and cook until the fat is rendered, about 3 minutes. Add the mushrooms and cook until tender, about 5 minutes. Add the onion, bell pepper and a generous pinch of salt. Stir occasionally until softened and brown, about 7 minutes. Let cool completely. In a large bowl, beat the eggs with the milk, mustard, soy sauce, pepper and 2 teaspoons of salt. Add the cooled vegetable mixture, challah, ham, cheeses and the chopped scallions, mix well. Scrape this mixture into the buttered baking dish, cover and refrigerate overnight. Pre-heat the oven to 350 degrees. Uncover the casserole, place it in the oven and bake for about 50 minutes. The top should be browned and the eggs set. Let it stand for 10 minutes then serve, garnish with scallions and serve with hot sauce if you like. Enjoy! 11/13/2023 0 Comments Roasted Squash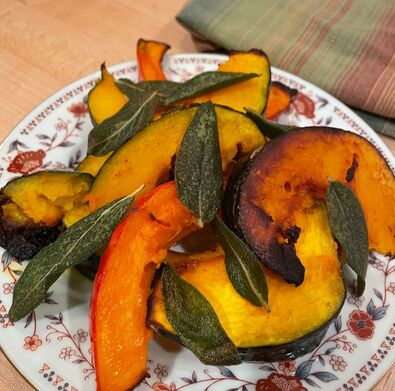 Thanksgiving is right around the corner. Are you still working on your menu planning? Here is a great fall recipe that could be a wonderful side dish for any night, and certainly fits on the traditional Thanksgiving table as well.
Ingredients: 4 tablespoons unsalted butter 1/2 vanilla bean, seeds scraped OR 1 teaspoon vanilla extract 4 lbs mixed squash, seeded and sliced into 1/2 wedges (2-3 small to medium squashes, such as kabocha, delicata, red kuri work well) 3 sage sprigs and 10-15 sage leaves salt and pepper to taste Instructions: Preheat your oven to 425 degrees. In a small sauce pan combine the vanilla, butter and sage (sprigs or 2-3 leaves). Cook on medium to low heat, stirring occasionally, until the butter browns and has a nutty aroma, about 5 minutes. Remove from heat and discard the sage and vanilla bean. Coat the squash with the butter and season with salt and pepper. Roast for about 25 minutes, turning half way, or until the squash is golden and crisp in spots and tender. As the squash is roasting fry the remaining sage leaves. This is a nice addition for the overall presentation of your squash, but also were a fun crunchy addition to the dish. In a small saucepan heat 2 tablespoons olive oil on medium high. Stir in the leaves and sauté until crisp, about 2 minutes. Drain them on a paper towel. Arrange the squash with the scattered sage leaves on a platter to serve. Enjoy! 9/11/2023 0 Comments Tomato and Cucumber Salad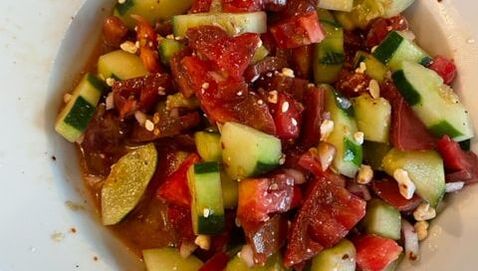 September might be the best time of year in Missoula for fresh local veggies, especially for a big juicy tomato. The tomatoes we can enjoy now make me wonder why I ever buy one at the store in December! So head on down to the farmers market to pick up a few nice looking tomatoes and a cucumber or two to make this classic and delicious salad. This salad is very versatile, and can easily be tweaked to your liking. For instance, trade out the feta cheese for some fresh mozzarella, or skip the cheese for dairy free. I have also added some cooked quinoa to make a this a more hearty lunch. It is also just as good the next day, it can be stored overnight in the fridge, but the next day it is best to take it out before eating to let it come up to room temperature.
Enjoy! Ingredients: 2 cups chopped tomato 1 1/2 cups peeled and chopped cucumber 1/4 cup diced red onion 1/4 cup crumbled feta 3 tablespoons olive oil 1 tablespoon red wine vinegar (or to taste) salt and pepper to taste Instructions: Mix all the ingredients together in a medium bowl, serve at room temperature. 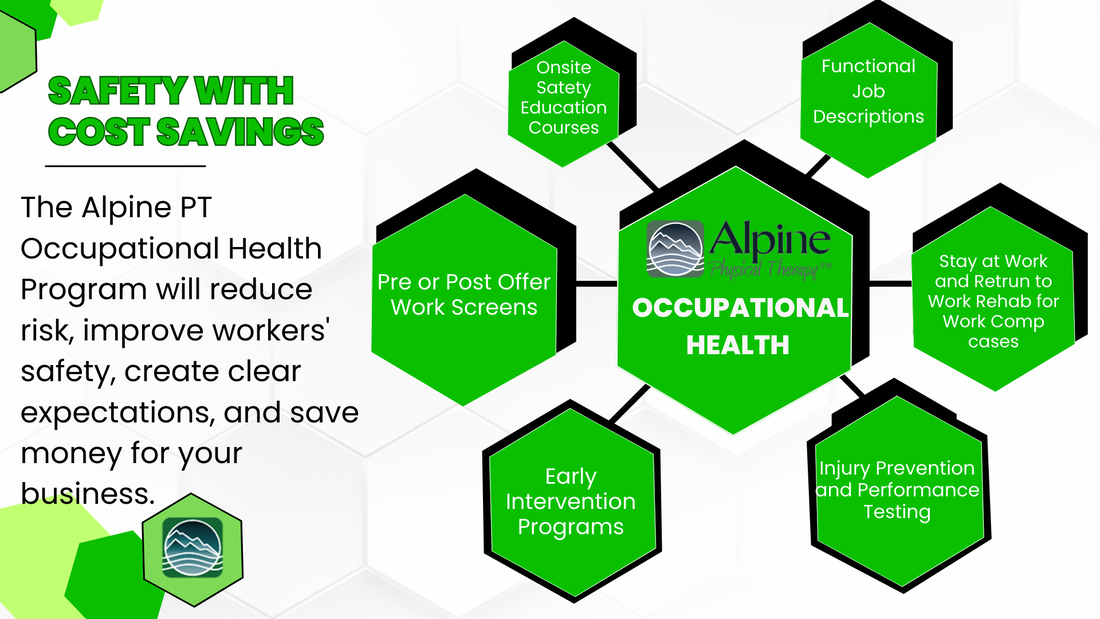 Occupational Health promotes and maintains the highest level of safety and physical well-being for optimal performance within a specific job setting. At Alpine PT, we offer several components to build a safe and effective working environment as well prepare and clear employees for best fitted positions. Current research demonstrates significant reduction with on the job injury and unnecessary disability when occupational health is used for pre placement testing, safety in lifting, early interventions, and early active intervention if injury does occur. Here are some frequently asked questions to help you understand what our offerings are:
What is a Pre Offer Work Screen? An employer will offer a new hire a position that might require physical demands, to ensure safety for the new employee there is a physical exam or Work Screen that is performed. These include job specific movements and tasks to assess the new employee's ability to complete the potential work tasks safely. Physical Therapists and Exercise Scientists generally provide feedback and assessment on these tests then the employer is notified of the results and or any recommendations for the new hire to ensure safety upon starting their new role. What companies does Alpine PT work with currently in providing Work Screens? NorthWest Energy, Montana Rail Link, Montana Schools Group InterLocal Authority, Dailey Meats, and others. How do companies find out more information about these offerings? Visit the Alpine PT website's page about Occupational Health ; call our Downtown Clinic and ask for RJ; or send an email to info@AlpinePTmissoula.com Who is on the Alpine PT Occupational Health Team? While all our talented PTs enjoy treating injuries related work; we have a specific team of staff members leading this area of specialty: Matt, Cole, Sam, and RJ. If there are questions or recommendations or referrals around Occupational Health please feel free to reach out to this team at Alpine. What else does the Occupational Health Team offer besides Pre/Post Offer Work Screens? There are many areas where PTs can help employers provide a safe and enjoyable workplace for their team. Alpine PT offers onsite educational presentations, injury prevention and performance assessment testing, early interventions and consults, and onsite ergonomic assessments. Why is Occupational Health important? By using professionals like PTs, employers can help keep their staff as healthy as possible and enjoy their jobs as well as being able to enjoy life outside of work. Research shows that preventive steps in managing injury and early intervention for injury management reduces total costs of claims, limits days off work, and improves employee retention and moral. The body is the most important tool out there - it is time to make sure we invest and take care of it! If you are interested in more information about how Alpine Physical Therapy can contribute to the health of your business, please call our Downtown office at (406)549-0064. |
 RSS Feed


|

|


|